Take a photo of coins and get the total value of them
Author/Partipatant: Zejun Lin
Contributions:
- Collect dataset
- Code in this Notebook
- With a slide for presentation
Links:
- Dataset: https://drive.google.com/file/d/1oiifbiPnHtTpn20PShbPrFe_JV9oDGPK/view?usp=sharing
- Yolov4 code: https://github.com/Tianxiaomo/pytorch-YOLOv4
- PyTorch Weight File: https://drive.google.com/file/d/110o6tbu15qYIhNMhBQU_Qtefn02j9HDR/view?usp=sharing
- Presentation: https://drive.google.com/file/d/1vu0oqGmp6soOwozjmMCW26c8P2cdreSk/view?usp=sharing
Description
What it is
When I first came to the US, I found it really difficult to count coins because there are many types of them and it is difficult to identify those tiny things just by their similar appearance.
Therefore, given the opportunity, I decide to develop an intelligent system that can tell people the total value of a bunch of coins just by taking a photo.
Deep Learning Model
Yolov4 — PyTorch version
I decide to try Yolov4 first, which is the SOTA model for object detection. I treat each kind of coin as a class of object. Then given an image, I try to find all different kinds of coins by the model, then apply postprocessing like NMS to get the result. Finally, but counting the number of different class of objects in the images, I can multiple them with denominations of different kinds of coins and get the total value.
Yolo is the abbreviation of You Only Look Once, used for Unified, Real-Time Object Detection. It frames object detection as a regression problem to spatially separated bounding boxes and associated class probabilities. A single neural network predicts bounding boxes and class probabilities directly from full images in one evaluation. Since the whole detection pipeline is a single network, it can be optimized end-to-end directly on detection performance.
More information of Yolo please refer to https://arxiv.org/abs/1506.02640
I choose one of the PyTorch implementation on Github: https://github.com/Tianxiaomo/pytorch-YOLOv4
Hyper parameter
After trying repeatedly, I found that…
- Batch size should be small — I tried 32/16/8, etc. but not work — loss didn’t decrease
Finally I decided to use 4 as the batch size
- Should optimize according to global step, so I set
subdivisionas 1 - Others:
max_batches: 10000 - steps: [8000, 9000]
- width == height == 800
Too large — out of memory - Too small — underfit
- lr: 0.001
This is fine as I use adam as optimize with a scheduler
- epoch: 600
Experiment
Dataset
Overview
I cannot find any coins dataset for object detection online. But I did find some pictures of coins. I also have some coins myself which I can take some photos of. So I will first utilize these photos, maybe do some transformation of them to get more raw data. Then I know there is some tools online for me to label them manually. The label for object detection is usually like:
- x1, y1, x2, y2, class_id
where, x1, y1, x2, y2 represents a bounding box.
Usually a input image has some bounding-box labels like this. By using the tool I can label the data.
For the test set, it’s pretty easy, that I just need to count coins with weight as their denominations and get the total value. A possible evalution method would be the accuracy.
Preprocessing
- I use a tool called labelImg, which can be install by
python3 -m pip install labelImg. - However, the output format is like (x_mid, y_mid, width, height class_id) (dtype = float as the % of width & height)
- So two preprocessing should be done:
Transform to (x_min, y_min, x_max, y_max, class_id) - Transform the unit from percentage to actual pixel
- Another one is that because I use IPhone to take these pictures and move to OS X by airdrop, the format of them is
HEIC, that I need to convert tojpg.
Download
Available on https://drive.google.com/file/d/1oiifbiPnHtTpn20PShbPrFe_JV9oDGPK/view?usp=sharing
1
2
3
4
5
6
7
8
9
10
11
12
13
14
15
16
17
18
19
import os
def mmwh2xyxy(root):
“””From x_mid, ymid, width, height
to x_min, y_min, x_max, y_max
“””
for fname in os.listdir(root):
base, *_, ext = fname.split(‘.’)
if ext != ‘txt’ or base == ‘classes’:
continue
res = []
with open(os.path.join(root, fname), ‘r’) as f:
for line in f:
if len(line) < 5:
continue
c, xm, ym, w, h = map(float, line.split())
bbox = [xm-w/2, ym-h/2, xm+w/2, ym+h/2]
res += “{} {} {} {} {}”.format(int(c), *map(lambda x:round(x, 6), bbox)),
with open(os.path.join(root, fname), ‘w’) as f:
f.write(‘\n’.join(res))
1
2
3
4
5
6
7
8
9
10
11
12
from wand.image import Image
def heic2jpeg(root):
for fname in os.listdir(root):
*_, ext = fname.split(‘.’)
if ext != ‘HEIC’:
continue
fpath = os.path.join(root, fname)
img=Image(filename=fpath)
img.format=’jpg’
img.save(filename=fpath[:-4]+’jpeg’)
img.close()
os.remove(fpath)
1
2
root = “/Users/danny/Desktop/coins”
heic2jpeg(root)
1
2
3
4
5
6
7
8
9
10
11
12
13
14
15
16
17
18
19
20
21
22
23
24
25
26
import cv2
import os
def convert2yolo_format(root):
res = []
for fname in os.listdir(root):
base, ext = fname.split(‘.’)
if ext != ‘txt’ or base == ‘classes’:
continue
with open(os.path.join(root, fname), 'r') as f:
cur = [base+'.jpg']
if base == 'train': continue
img = cv2.imread(os.path.join(root, cur[0]))
height, width, _ = img.shape
for line in f:
if len(line) < 5:
continue
xmin, ymin, xmax, ymax = map(float, line.split()[1:])
c = int(line.split()[0])
if c == 5:
c -= 1 #skip error class name -- 'classes'
cur += "{},{},{},{},{}".format(int(xmin*width), int(ymin*height), int(xmax*width), int(ymax*height), c),
res += ' '.join(cur),
with open(os.path.join(root, 'train.txt'), 'w') as f:
f.write('\n'.join(res))
print('Done')
1
convert2yolo_format(root)
1 | Done |
Training
1
2
3
4
5
from matplotlib import pyplot as plt
def show_img(path):
img = cv2.imread(path)
plt.figure(dpi=300)
plt.imshow(img)
Loss
1
show_img(‘loss.png’)
Avg Precision & Avg Recall
1
show_img(‘apac.png’)
Model Selection
According to the figure by tensorboard, I selected Yolov4_epoch411 as the final model and the result looks good.
Inference
Global variables
1
2
3
4
5
6
7
import os
import cv2
n_classes = 6
height = 1280
width = 1280
namesfile = ‘data/classes.txt’
os.environ[‘CUDA_VISIBLE_DEVICES’] = “0,1,2,3,4,5”
1
2
3
4
5
6
7
8
9
10
11
12
13
14
15
16
17
18
19
20
21
22
23
24
25
26
27
28
29
30
31
32
33
34
35
36
37
38
39
40
41
42
43
44
45
46
47
48
%matplotlib inline
from matplotlib import pyplot as plt
def plot_boxes_cv2(img, boxes, savename=None, class_names=None, color=None):
“””Plot bbox on the images”””
img = np.copy(img)
colors = np.array([[1, 0, 1], [0, 0, 1], [0, 1, 1], [0, 1, 0], [1, 1, 0], [1, 0, 0]], dtype=np.float32)
def get_color(c, x, max_val):
    ratio = float(x) / max_val * 5
    i = int(math.floor(ratio))
    j = int(math.ceil(ratio))
    ratio = ratio - i
    r = (1 - ratio) * colors[i][c] + ratio * colors[j][c]
    return int(r * 255)

width = img.shape[1]
height = img.shape[0]
for i in range(len(boxes)):
    box = boxes[i]
    x1 = int(box[0] * width)
    y1 = int(box[1] * height)
    x2 = int(box[2] * width)
    y2 = int(box[3] * height)

    if color:
        rgb = color
    else:
        rgb = (255, 0, 0)
    if len(box) >= 7 and class_names:
        cls_conf = box[5]
        cls_id = box[6]
print(‘%s: %f’ % (class_names[cls_id], cls_conf))
        classes = len(class_names)
        offset = cls_id * 123457 % classes
        red = get_color(2, offset, classes)
        green = get_color(1, offset, classes)
        blue = get_color(0, offset, classes)
        if color is None:
            rgb = (red, green, blue)
        img = cv2.putText(img, class_names[cls_id], (x1, y1), cv2.FONT_HERSHEY_SIMPLEX, 5, rgb, 10)
    img = cv2.rectangle(img, (x1, y1), (x2, y2), rgb, 10)
from copy import deepcopy
img = deepcopy(img)
if savename:
    cv2.imwrite(savename, img)
else:
    plt.imshow(img)
return img
1
2
3
4
5
6
7
8
9
10
11
12
13
14
15
16
17
18
19
20
21
22
23
24
25
26
27
28
29
30
31
32
33
34
35
36
37
38
39
40
41
42
43
44
45
46
47
48
49
50
51
52
53
54
55
from models import *
import torch
import subprocess
def load_class_names(namefile):
class_names = []
with open(namesfile, ‘r’) as fp:
lines = fp.readlines()
for line in lines:
class_names += line.rstrip(),
return class_names
def load_model(weight_file):
model = Yolov4(yolov4conv137weight=None, n_classes=n_classes, inference=True)
if torch.cuda.device_count() > 0:
    model = torch.nn.DataParallel(model)
pretrained_dict = torch.load(weight_file, map_location=torch.device('cuda'))
model.load_state_dict(pretrained_dict)
return model
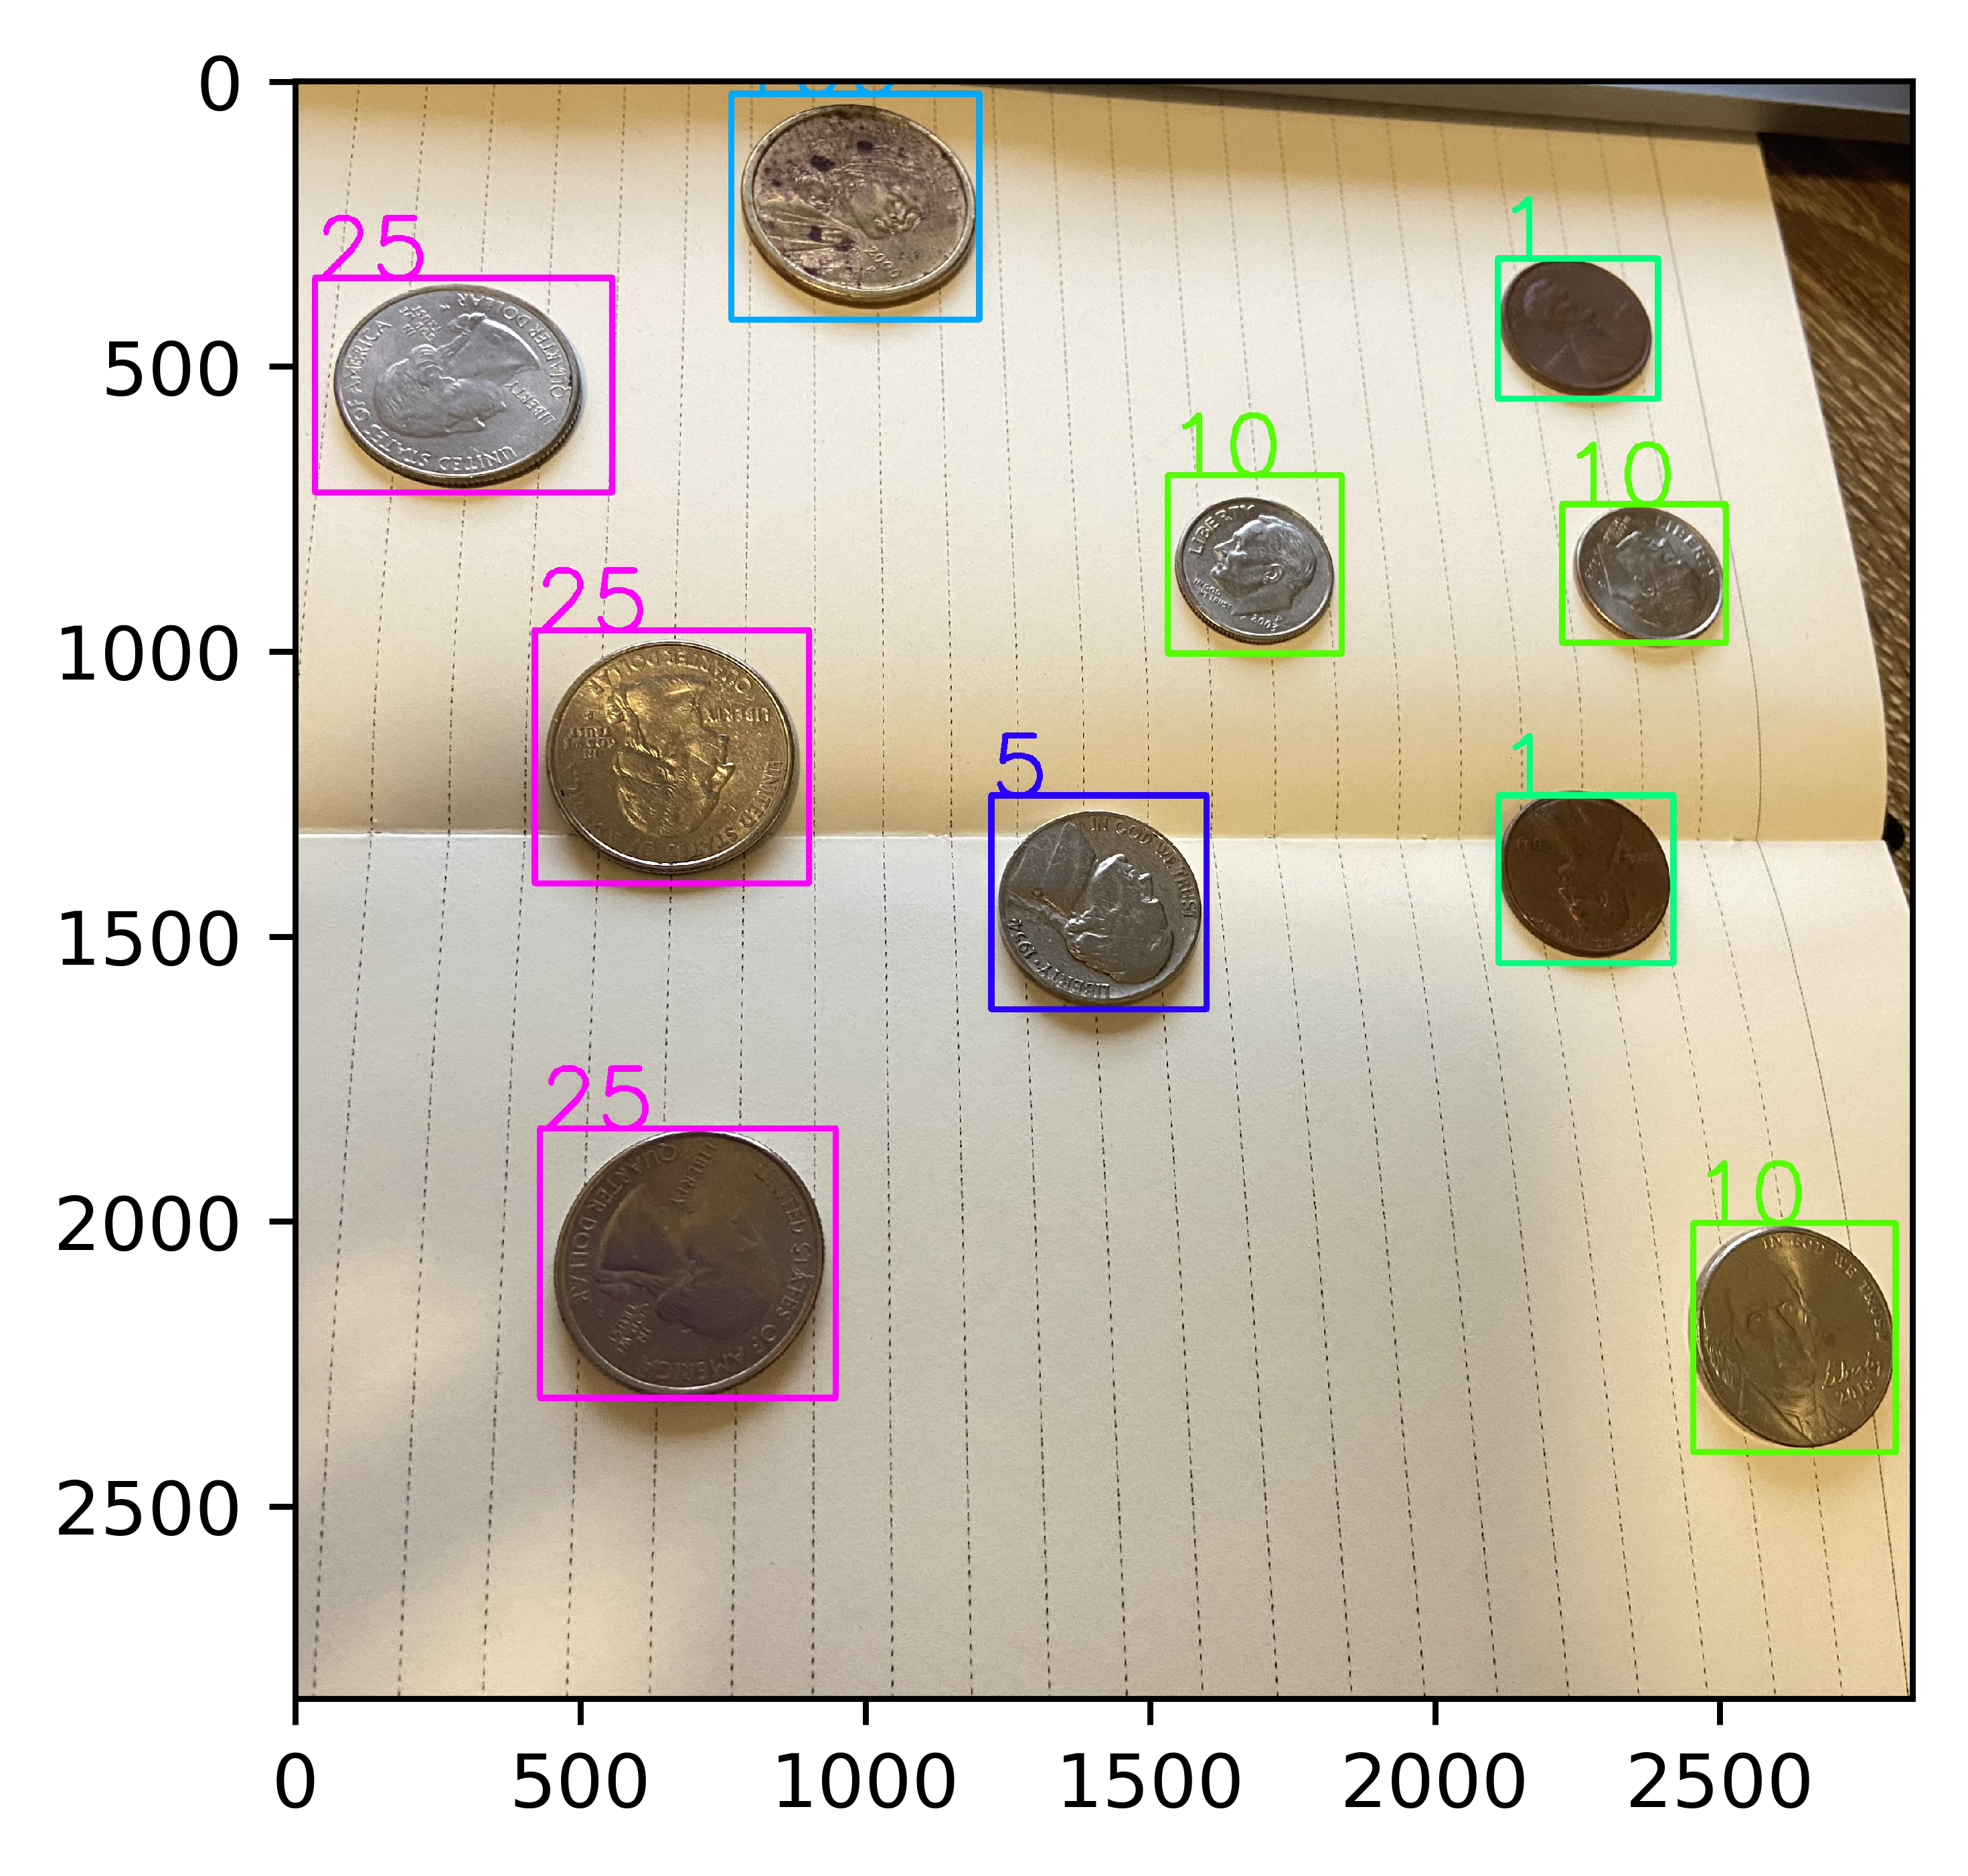
def count_and_plot(img_file, model):
“””
Count the total value of coins in the image,
and plot the predicted image with bounding box”””
img = cv2.imread(img_file)
# Inference input size is not necessarily be the training input size
# Optional inference sizes:
# Hight in {320, 416, 512, 608, … 320 + 96 * n}
# Width in {320, 416, 512, 608, … 320 + 96 * m}
sized = cv2.resize(img, (width, height))
sized = cv2.cvtColor(sized, cv2.COLOR_BGR2RGB)
boxes = do_detect(model, sized, 0.4, 0.6, True)
class_names = load_class_names(namesfile)
tmpfile = “/tmp/prediction.jpeg”
plot_boxes_cv2(img, boxes[0], savename=tmpfile, class_names=class_names)
import matplotlib.pyplot as plt
import matplotlib.image as mpimg
img = mpimg.imread(tmpfile)
plt.figure(dpi=800)
plt.imshow(img)
print_bbox_info(boxes, class_names)
def print_bbox_info(boxes, class_names):
from collections import Counter
cnt = Counter()
for box in boxes[0]:
cls_id = box[6]
cls_name = class_names[cls_id]
cnt[int(cls_name)] += 1
total = 0
print(“There are:”)
for coin, n in cnt.items():
print(“{} {} cent(s) coins;”.format(n, coin))
total += n * coin
print(“Totally: {} cents”.format(total))
1
2
weight_file = “Yolov4_epoch411.pth”
model = load_model(weight_file)
Predict, Plot BBox & Get total values
1
count_and_plot(“data/imgs/IMG_4755.jpeg”, model)
1 | ----------------------------------- |
1
count_and_plot(“data/imgs/IMG_4766.jpeg”, model)
1 | ----------------------------------- |
Some problems I came across
- Library used by Python Kernel is not the same as the one in shell, which cause
load_weightfail. - Cannot use cv2.imshow & cv2.retangle on remote Jupyter notebook due to QT module missing.